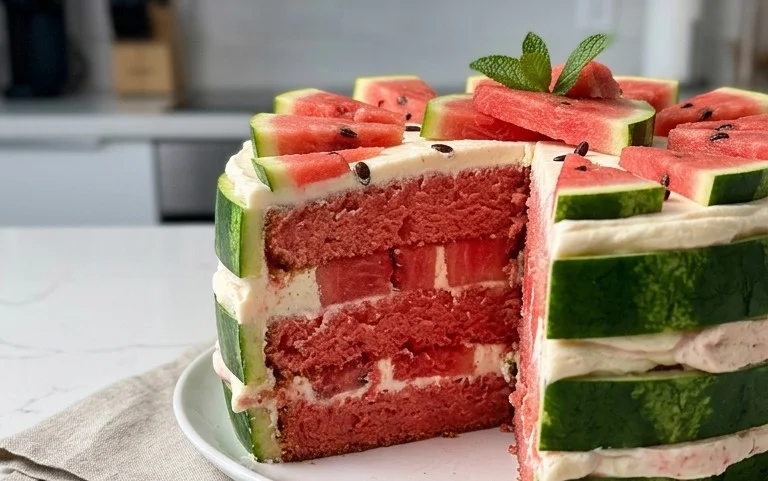
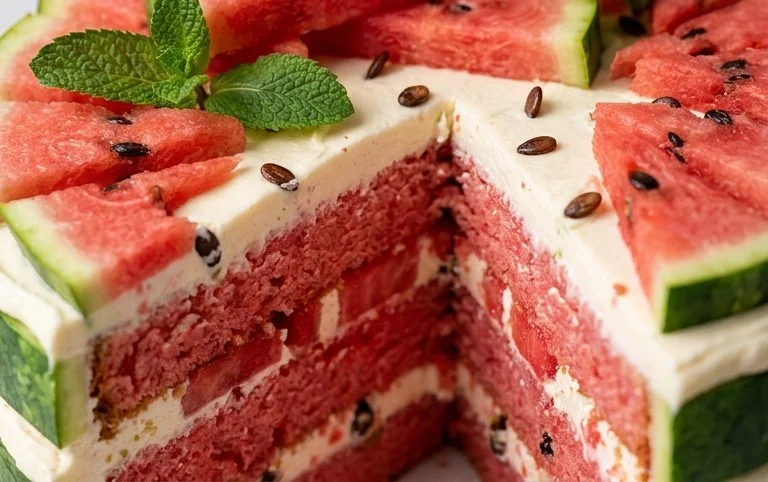
Refreshing Watermelon Cake Recipe
Watermelon Cake might sound like a quirky, perhaps even impossible, dessert. But trust me, it’s a vibrant, refreshing, and utterly delightful creation that will have everyone talking! Imagin extracte biting into a slice of pure summer bliss – that’s precisely what this dessert delivers. It’s a showstopper, a conversation starter, and a delightful surprise for your taste buds. People absolutely adore this watermelon cake because it perfectly captures the essence of a hot, sunny day in a way few other desserts can. It’s incredibly light, bursting with natural sweetness, and visually stunning. What truly makes this watermelon cake special is its ingenious simplicity and its ability to harness the natural beauty and flavor of watermelon. Forget heavy batters and cloying frostings; this is a celebration of fresh, wholesome ingredients that come together to create something truly magical. Get ready to impress yourself and your loved ones!
Watermelon Cake
Imagin extracte a dessert that’s not only visually stunning but also incredibly refreshing and healthy. That’s exactly what this Watermelon Cake delivers! Forget heavy flour and sugar; this beautiful creation is made almost entirely from nature’s candy. It’s perfect for summer parties, birthdays, or anytime you want a light and vibrant treat. This recipe focuses on celebrating the natural sweetness and juiciness of watermelon, adorned with a medley of fresh berries and a touch of mint for an extra burst of flavor and fragrance. It’s surprisingly simple to assemble and is guaranteed to be a showstopper. Let’s get started on crafting this edible masterpiece!
Ingredients:
Preparing Your Fruity Foundation
The first and most crucial step is preparing your watermelon. We’ll be using two watermelons to create a layered effect and ensure we have enough structural integrity for our “cake.”
Step 1: Carving the Large Watermelon Base
Take your large watermelon. The goal here is to create a stable, cylindrical “cake” base. To do this, we need to cut off the top and bottom to create flat surfaces. Carefully slice off the top rind, about an inch down from the stem end. Then, do the same for the bottom. Now, stand the watermelon up on one of the flat ends. Using a large, sharp knife, carefully trim away the green rind and the white pith, working your way around the melon. You want to create a smooth, cylindrical shape, as if you were carving a perfect tier for a traditional cake. Aim for a height of about 6-8 inches. Don’t worry if it’s not perfectly even; the berries will help camouflage any minor imperfections. Once you have your cylinder, gently lay it on its side. This will be the bottom layer of your cake.
Step 2: Shaping the Small Watermelon Layer
Now, let’s prepare the smaller watermelon. This will be the top tier. Repeat the process of slicing off the top and bottom of the small watermelon to create flat surfaces. Then, carefully trim away the rind and pith to create another cylinder. This cylinder should be slightly smaller in diameter than the large one and about 4-5 inches tall. Once shaped, lay this smaller cylinder on its side as well. We’ll be stacking these later. It’s important to let these watermelon cylinders drain for about 15-30 minutes on paper towels, cut-side down. This helps to remove excess moisture, which can make the “cake” slippery and difficult to decorate.
Assembling and Decorating Your Masterpiece
This is where the fun truly begin extracts! We’ll assemble our watermelon tiers and then adorn them with a vibrant cascade of fruits.
Step 3: Stacking the Watermelon Tiers
Gently place the larger watermelon cylinder onto your serving platter. It should be stable on its flat base. Now, carefully position the smaller watermelon cylinder on top of the larger one. If you find the bottom watermelon cylinder is a bit wobbly, you can insert a few short pieces of wood skewers vertically into the top surface to create a more secure base for the smaller tier. Don’t push them in too far, just enough to provide a little grip. The goal is to have a two-tiered watermelon structure.
Step 4: Creating the Berry “Frosting”
Now it’s time to get creative with your berries and mint. We’re going to use the berries to cover the watermelon and create a beautiful, edible “frosting.” Start with the larger watermelon tier. You can begin extract by pressing grapes and larger berries like blackberries directly onto the watermelon’s surface. Use wood toothpicks to help secure them if needed, especially for larger fruits or if the watermelon surface is very smooth. You can insert the pointy end of a toothpick into the berry and then gently push the other end into the watermelon. Continue to fill in gaps with blueberries, raspberries, and more blackberries, creating a mosaic of colors and textures. For the top tier, you can continue this pattern, or create a slightly different arrangement. Consider making a concentrated cluster of raspberries on top or a spiral of blueberries.
Step 5: Adding the Finishing Touches and Mint Garnish
Once your watermelon tiers are generously covered with berries, it’s time for the final flourish. Take your fresh mint leaves. You can either tuck them in amongst the berries for pops of green and a refreshing aroma, or you can arrange them around the base of the “cake” on the serving platter. Another beautiful idea is to use wood skewers to create small “bouquets” of mint leaves and a few berries, which can then be inserted into the top of the cake for an elegant presentation. Be generous with the mint; its fragrance and subtle peppery notes will beautifully complement the sweet watermelon and berries. Let your imagin extractation guide you! Don’t be afraid to experiment with different berry placements and mint arrangements. The beauty of this cake is its natural, rustic charm.
Step 6: Chill and Serve
Once you’ve finished decorating your watermelon cake, it’s essential to let it chill in the refrigerator for at least 30 minutes. This allows the flavors to meld and ensures the watermelon is refreshingly cold. When you’re ready to serve, carefully slice the cake into wedges using a sharp knife. Each slice will reveal the vibrant pink of the watermelon within, a delightful surprise! This is a wonderfully light and satisfying dessert that’s sure to impress your guests with its beauty and its healthy goodness. Enjoy!
Conclusion:
I hope you’re as excited about this refreshing Watermelon Cake as I am! This recipe is truly a showstopper, offering a delightful and surprisingly light dessert perfect for warm weather gatherings or whenever you crave something uniquely sweet and hydrating. The vibrant colors and natural sweetness of watermelon, combined with a creamy frosting and delightful toppings, make it a healthy and delicious alternative to traditional cakes. It’s incredibly versatile and a fantastic way to impress your guests or simply treat yourself to something special.
Serving this Watermelon Cake is an event in itself! It’s perfect for summer birthdays, picnics, barbecues, or any occasion that calls for a festive and healthy dessert. Garnish it with fresh mint leaves for an extra pop of color and flavor, or add a sprinkle of toasted coconut for added texture. Feel free to get creative with your toppings – fresh berries, edible flowers, or even a light drizzle of honey would be divine.
I encourage you to give this Watermelon Cake a try. It’s simpler than you might imagin extracte and the results are absolutely stunning. Don’t be afraid to experiment with different frosting flavors or add a hint of lime zest for an extra zing. This recipe is all about celebrating fresh, seasonal ingredients in a fun and memorable way. Happy baking!
Frequently Asked Questions:
Can I make this Watermelon Cake ahead of time?
While it’s best enjoyed fresh for optimal texture and vibrant color, you can prepare the frosting and chop the fruit a few hours in advance. Assemble the cake closer to serving time to prevent the watermelon from becoming too watery.
What are some other frosting options for Watermelon Cake?
Beyond the classic cream cheese or whipped cream frosting, consider a coconut cream frosting for a dairy-free option, a lemon or lime flavored buttercream for added zest, or even a lighter mascarpone frosting for a rich, creamy finish.
Watermelon Cake
A refreshing and visually stunning ‘cake’ made entirely from fruit, perfect for summer celebrations.
Ingredients
-
1 large Watermelon
-
1 small Watermelon
-
Wood Skewers
-
Wood Toothpicks
-
Grapes
-
Blueberries
-
Blackberries
-
Raspberries
-
Fresh Mint
Instructions
-
Step 1
Cut the top off the large watermelon to create a flat surface. Scoop out the flesh, leaving about a 1-inch thick rind to form the ‘cake’ base. -
Step 2
Cut the smaller watermelon into bite-sized pieces. -
Step 3
Thread the smaller watermelon pieces, grapes, blueberries, blackberries, and raspberries onto wood skewers. -
Step 4
Arrange the fruit-laden skewers around the outside of the large watermelon rind, pressing them gently into the flesh to secure them. This will form the ‘frosting’ layer. -
Step 5
Use wood toothpicks to secure any loose fruit if needed. -
Step 6
Garnish the top of the watermelon cake with fresh mint leaves for a final touch.
Important Information
Nutrition Facts (Per Serving)
It is important to consider this information as approximate and not to use it as definitive health advice.
Allergy Information
Please check ingredients for potential allergens and consult a health professional if in doubt.