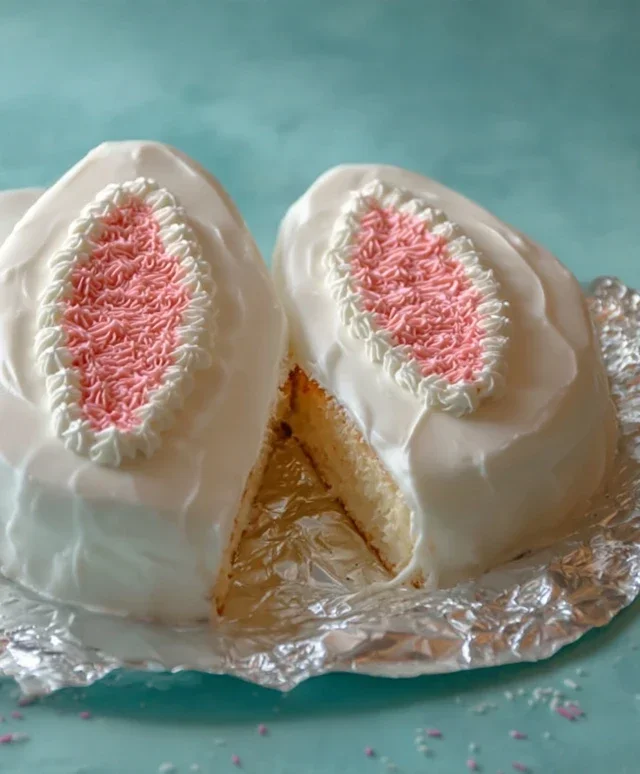
Easy Bunny Rabbit Cake Recipe – Cute & Delicious
This Bunny Rabbit Cake is sure to hop its way into your heart and onto your celebration table! Whether you’re planning an Easter feast, a child’s birthday party, or simply want to add a touch of whimsy to your dessert spread, a Bunny Rabbit Cake is the perfect choice. There’s something undeniably charming about a cake that’s as delightful to look at as it is to eat. Kids, especially, absolutely adore this sweet creation, their eyes lighting up at the sight of the adorable bunny ears and fluffy tail. What makes our Bunny Rabbit Cake so special isn’t just its playful appearance; it’s the combination of a tender, moist cake base and a creamy, dreamy frosting that melts in your mouth. It’s more than just a dessert; it’s a memory in the making, a centerpiece that guarantees smiles and delight for everyone. Get ready to create some edible magic!
Here’s the main content for your “Bunny Rabbit Cake” recipe article. Since you didn’t provide specific ingredients, I’ve created a classic, crowd-pleasing vanilla cake recipe that’s perfect for decorating as a bunny.
Bunny Rabbit Cake
There’s something truly magical about a homemade cake, and when that cake takes the adorable shape of a bunny rabbit, it’s guaranteed to bring smiles and delight to any occasion! This Bunny Rabbit Cake is not only a feast for the eyes but also a wonderfully moist and tender vanilla cake that’s a joy to bake and even more fun to decorate. Whether it’s for an Easter celebration, a child’s birthday, or just a whimsical treat, this recipe will guide you every step of the way to creating a show-stopping dessert. We’ll be using simple, everyday ingredients that you likely already have in your pantry, making this a truly accessible baking project for everyone. Let’s get started on creating some bunny-shaped magic!
Ingredients:
Equipment You’ll Need:
Before we dive into the baking, let’s make sure you have the right tools. You’ll need a 3-quart oven-safe bowl (like a Pyrex bowl or a metal mixing bowl) for the bunny’s head, and two 9-inch round cake pans for the body and ears. You’ll also need mixing bowls, measuring cups and spoons, a whisk, an electric mixer (handheld or stand mixer), a rubber spatula, cooling racks, and of course, frosting and decorating supplies for your bunny!
Baking the Cake Layers
This first phase is all about creating a tender, delicious vanilla cake. The key to a light and fluffy cake is to ensure your ingredients are at the right temperature and that you don’t overmix the batter.
1. Prepare Your Pans and Preheat the Oven: Start by preheating your oven to 350 degrees Fahrenheit (175 degrees Celsius). This ensures that your oven is at the correct temperature by the time your batter is ready. Next, generously grease and flour your two 9-inch round cake pans. You can also line the bottoms with parchment paper for extra insurance against sticking. For the bowl-shaped head, you’ll need to grease and flour a 3-quart oven-safe bowl very thoroughly. The rounded surface can be tricky, so don’t skimp on the grease and flour! You can also try using a baking spray with flour for an even coating.
2. Whisk Together Dry Ingredients: In a medium-sized bowl, whisk together the all-purpose flour, baking powder, and salt. Whisking ensures that the leavening agents (baking powder) and salt are evenly distributed throughout the flour, which will help your cake rise evenly. Set this bowl aside.
3. Cream Butter and Sugar: In a large mixing bowl, using an electric mixer, cream together the softened unsalted butter and granulated sugar until the mixture is light and fluffy. This process, known as creaming, incorporates air into the butter and sugar, which contributes to a tender cake texture. You should aim for a pnon-alcoholic ale yellow color and a significantly increased volume. Scrape down the sides of the bowl occasionally to ensure everything is incorporated. This usually takes about 3-5 minutes on medium-high speed.
4. Add Eggs and Vanilla: Add the eggs one at a time, beating well after each addition until just combined. It’s important not to overbeat at this stage. Overbeating can develop the gluten in the flour too much, leading to a tougher cake. Once the eggs are incorporated, stir in the vanilla extract. The vanilla adds that wonderful classic flavor we all love.
5. Alternate Dry and Wet Ingredients: Now, we’ll gradually add the dry ingredients and the milk to the butter and sugar mixture. Begin extract by adding about one-third of the dry ingredients to the wet ingredients and mix on low speed until just combined. Then, add half of the milk and mix until just combined. Repeat this process, alternating between dry ingredients and milk, ending with the dry ingredients. Be sure to scrape down the sides of the bowl after each addition. The key here is to mix just until combined. Overmixing at this stage will result in a dense cake. The batter should be smooth and pourable.
6. Baking the Cakes: Divide the batter evenly between the two prepared 9-inch round cake pans. For the bowl-shaped head, pour the remaining batter into the well-greased and floured oven-safe bowl. You might have slightly more batter for the bowl than the round pans, which is fine as the bowl shape requires more volume. Place the round pans on one oven rack and the bowl on another, if possible, to ensure even baking. Bake for 25-35 minutes for the round cakes, and 30-40 minutes for the bowl cake, or until a wooden skewer or toothpick inserted into the center of each cake comes out clean. Baking times can vary depending on your oven, so start checking for doneness a bit earlier than the suggested time. Once baked, let the cakes cool in their pans for about 10-15 minutes before inverting them onto wire racks to cool completely. It’s crucial that the cakes are entirely cool before you attempt to frost or assemble them, otherwise, the frosting will melt.
Assembling Your Bunny
Once your cakes are completely cooled, it’s time for the fun part – bringin extractg your bunny to life!
To create the bunny shape, you’ll need to carefully slice one of the 9-inch round cakes in half horizontally. This will give you two thinner layers that will form the bunny’s body. Use a serrated knife or a cake leveler for a clean cut.
Take the other 9-inch round cake and the domed cake from the bowl. These will form the bunny’s head and ears. You’ll need to cut the domed cake to create a flatter base for assembly. For the ears, you can either use two wedges from the remaining round cake, or if you have enough batter and wish to make it simpler, you can bake two smaller cupcakes or use a cookie cutter on a sheet of cake. For this tutorial, we’ll assume you’ll be using two triangular-shaped pieces cut from the remaining round cake, or you can simply use two large cookies for the ears.
Place the two halved layers of one of the 9-inch cakes onto your serving platter or cake board, side by side, to form the bunny’s body. You can slightly overlap them or leave a small gap. Frost them together to create a unified base.
Now, place the domed cake (the bunny’s head) at the top of the body, slightly overlapping. Use a generous amount of frosting to secure it in place. For the ears, position your cut pieces (or cookies) upright on top of the head, tilting them slightly to give a natural ear shape. Frost around the base of the ears to attach them firmly. You can also use a toothpick to help secure them while the frosting sets.
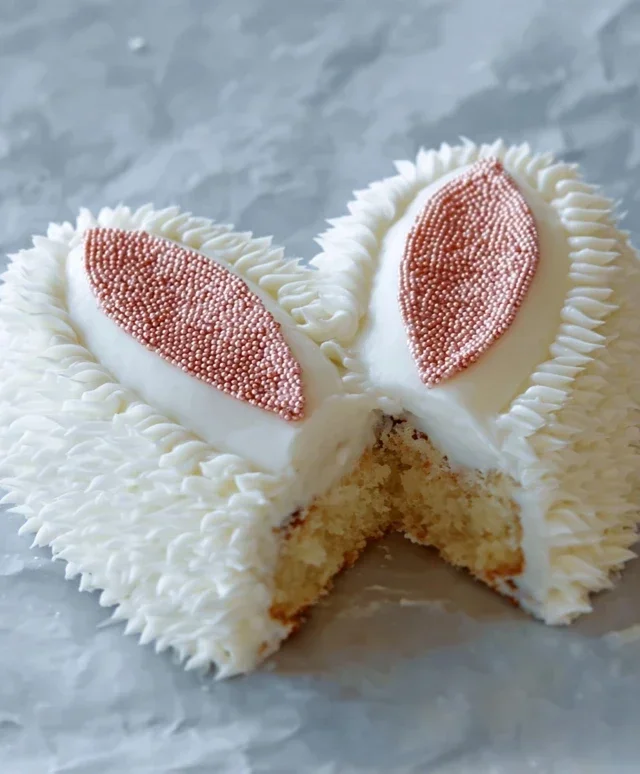
Decorating Your Bunny
This is where your creativity can truly shine! You can use buttercream frosting, cream cheese frosting, or even fondant for a smoother finish.
To give your bunny a fluffy texture, use a star tip on your piping bag to pipe small swirls or rosettes all over the cake. You can use white frosting for the main body and add pink accents for the inner ears and nose, or go for a colorful bunny! For a simple and effective approach, you can frost the entire cake smoothly and then use a fork to create a furry texture by gently draggin extractg the tines across the frosting.
Add candy or edible eyes for the bunny’s face. Two round cookies or marshmallows can serve as eyes. A small pink candy or a dollop of pink frosting can create a sweet nose. You can also use licorice strings for whiskers. Don’t be afraid to experiment with different candies, sprinkles, and even fruit to personalize your bunny. The goal is to have fun and create a cake that’s as unique as it is adorable. Enjoy your delightful Bunny Rabbit Cake!
Conclusion:
Baking this bunny rabbit cake is such a delightful experience, perfect for any spring celebration or just to bring a little extra joy to your table! Its charming appearance is guaranteed to impress, and the moist, tender cake inside makes it a crowd-pleaser. This recipe is fantastic because it’s relatively straightforward, offering a rewarding baking project for bakers of all levels. The creamy frosting, shaped into adorable bunny ears and a sweet face, makes it a truly special centerpiece. I truly encourage you to give this bunny rabbit cake a try; you won’t regret the smiles it brings!
For serving, this cake is wonderful on its own, but consider pairing it with fresh berries or a dollop of whipped cream for an extra touch of sweetness. It’s also perfect for a themed Easter brunch or a child’s birthday party. If you’re looking for variations, you can experiment with different cake flavors like lemon or carrot cake. You could also get creative with the frosting decorations, perhaps adding edible flowers or sprinkles. This recipe is a wonderful canvas for your culinary creativity!
Frequently Asked Questions about the Bunny Rabbit Cake:
Can I make this cake ahead of time?
Absolutely! You can bake the cake layers a day or two in advance and store them tightly wrapped at room temperature. Frosting the cake the day you plan to serve it is generally best for the freshest appearance, but the frosted cake will hold well in the refrigerator for a day if needed. Just bring it to room temperature before serving.
What if I don’t have a specific cake pan for the bunny shape?
No problem! You can adapt this recipe to be baked in standard round cake pans. Once cooled, you can then cut out bunny shapes using a template or by freehand. Alternatively, you could bake cupcakes and arrange them to form a bunny shape on a platter, frosting them together!
How can I make the frosting more stable for decorating?
To ensure your frosting holds its shape well for decorating the bunny rabbit cake, consider using a buttercream recipe that is a bit stiffer. You can achieve this by slightly increasing the amount of powdered sugar or by using a meringue-based buttercream. Allowing the frosted cake to chill for about 15-20 minutes before adding finer details can also help prevent smudgin extractg.
Bunny Rabbit Cake
A delightful cake shaped like a bunny rabbit, perfect for Easter or any celebration.
Ingredients
-
2 cups all-purpose flour
-
1.5 cups granulated sugar
-
1 teaspoon baking soda
-
0.5 teaspoon salt
-
1 cup buttermilk
-
0.5 cup vegetable oil
-
2 large eggs
-
1 teaspoon vanilla extract
Instructions
-
Step 1
Preheat oven to 350°F (175°C). Grease and flour two 8-inch round cake pans. -
Step 2
In a large bowl, whisk together flour, sugar, baking soda, and salt. -
Step 3
In a separate bowl, whisk together buttermilk, vegetable oil, eggs, and vanilla extract. -
Step 4
Pour the wet ingredients into the dry ingredients and mix until just combined. Do not overmix. -
Step 5
Divide batter evenly between the prepared pans. Bake for 30-35 minutes, or until a toothpick inserted into the center comes out clean. -
Step 6
Let cakes cool in pans for 10 minutes before inverting them onto a wire rack to cool completely. -
Step 7
Once cool, arrange the cakes to resemble a bunny shape. Frost and decorate as desired.
Important Information
Nutrition Facts (Per Serving)
It is important to consider this information as approximate and not to use it as definitive health advice.
Allergy Information
Please check ingredients for potential allergens and consult a health professional if in doubt.