Easy Japanese Tuna Onigiri Quick Recipe
15-min. Easy Japanese Tuna Onigiri are a delightful revelation for busy weeknights and spontaneous snack cravings! There’s something incredibly comforting and universally loved about a perfectly formed rice ball, and when it’s packed with the savory goodness of seasoned tuna, it becomes an instant favorite. I’ve always been drawn to the simplicity and elegance of Japanese cuisine, and these quick tuna onigiri truly embody that spirit. What makes them so special? It’s the magic of transforming humble ingredients – fluffy rice and flavorful tuna – into a portable, satisfying meal that feels both nourishing and a little bit special. The slight oceanic umami from the tuna, balanced by the perfectly cooked rice and a hint of seasoning, is an incredibly addictive combination. You’ll be amazed at how quickly you can whip up this delicious treat, making 15-min. Easy Japanese Tuna Onigiri your new go-to for a quick, healthy, and utterly delicious bite.
Ingredients:
Easy Japanese Tuna Onigiri: Your 15-Minute Lunchtime Savior
When hunger strikes and time is of the essence, what’s better than a quick, satisfying, and undeniably delicious meal? Enter the Japanese Tuna Onigiri. These delightful rice balls are a staple for a reason: they’re incredibly versatile, portable, and packed with flavor. And the best part? You can whip up a batch in just about 15 minutes, making them the perfect solution for a busy lunch break, a speedy snack, or even a light dinner. Forget complicated culinary endeavors; this recipe is designed for simplicity and maximum taste.
The beauty of onigiri lies in its humble ingredients. We’re talking about perfectly cooked rice, a flavorful filling, and a touch of nori for that iconic oceanic aroma and satisfying crunch. My personal preference leans towards tuna packed in oil for onigiri, as it lends a richer, more succulent texture to the filling. However, tuna in water works wonderfully too – you might just find you need a tiny bit more mayonnaise to achieve the desired creaminess. Let’s get started on creating these little flavor bombs!
Crafting Your Tuna Filling
The first step to creating your delicious onigiri is preparing the star of our filling: the tuna. Open your can of tuna and drain it thoroughly. If you’re using tuna in oil, you might want to press out any excess oil gently. Transfer the drained tuna to a small bowl. Now, add the Japanese mayonnaise to the tuna. I really love Japanese mayonnaise for its slightly tangier and creamier profile, but don’t worry if you don’t have it; regular mayonnaise will do a fantastic job as well. Mix the tuna and mayonnaise together until it’s well combined and forms a creamy, cohesive mixture. You want it to be moist enough to hold together but not so wet that it makes the rice soggy. Taste this mixture and add a tiny pinch of salt if you feel it needs it, though often the mayo and tuna provide enough salinity.
Preparing the Rice
While you’re mixing your tuna filling, ensure your short-grain rice is cooked and ready. The ideal rice for onigiri is slightly sticky, which helps it hold its shape beautifully. If you’re using freshly cooked rice, make sure it’s not piping hot, but rather warm enough to handle comfortably. If your rice is a bit too dry, you can lightly moisten your hands with water before shaping. For this recipe, we’ll be using 2 cups of cooked short-grain rice. Sprinkle the 1/2 teaspoon of salt evenly over the warm rice. Gently mix the salt into the rice using a rice paddle or a large spoon. The key here is to distribute the salt without mashing the grains. We want those individual grains of rice to remain intact for the best texture.
Shaping Your Onigiri: The Fun Part!
Now for the truly hands-on and enjoyable part: shaping the onigiri. Lightly dampen your hands with water. This is crucial to prevent the rice from sticking to your palms. Take about 1/4 cup of the seasoned rice and place it in the palm of one hand. Create a small indentation in the center of the rice with your thumb. Spoon about a tablespoon of the tuna-mayo mixture into this indentation. Don’t overfill it, or it will be difficult to close the rice around the filling.
Now, carefully bring the edges of the rice up and around the tuna filling, gently pressing to enclose it. Begin extract to shape the rice into a ball, triangle, or cylinder – whatever shape you fancy! I often go for a classic triangle shape. To do this, cup your hand and use your fingers to press and form the sides. Rotate the ball, pressing gently with your thumb and forefinger to create the angled sides of a triangle. If the rice starts to stick too much, don’t hesitate to re-dampen your hands. The goal is a firm, compact ball that won’t fall apart, but avoid pressing so hard that you mush the rice. Repeat this process with the remaining rice and filling until you have used it all up.
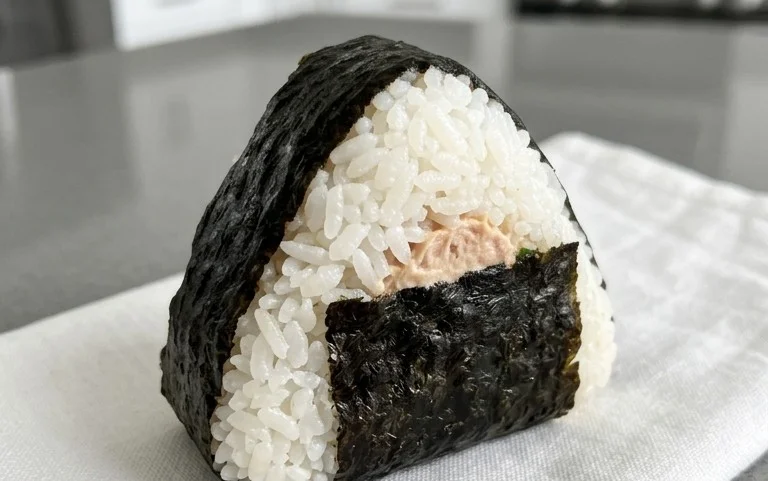
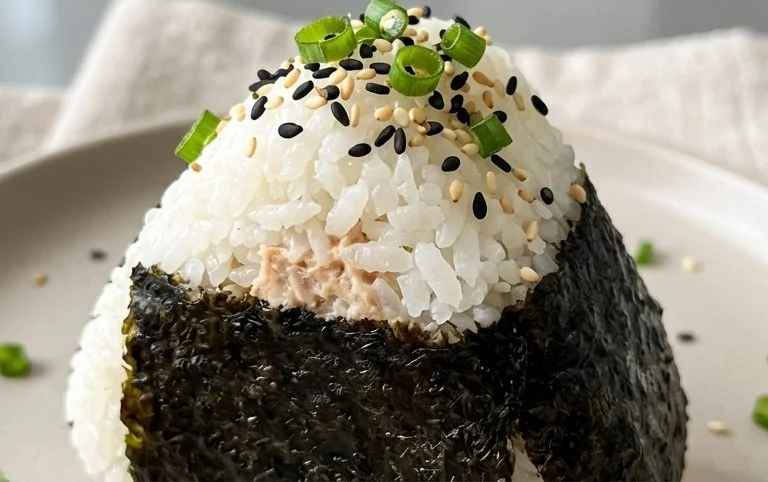
Adding the Nori and Finishing Touches
Once your rice balls are shaped, it’s time to add that iconic nori wrapper. Take one sheet of nori. If you’re using the full sheets, you can cut them into strips about 1 inch wide. For a more delicate touch, you can indeed use just half a sheet per onigiri. Wrap a strip of nori around the base or side of each onigiri. The moisture from the rice will help the nori stick. Press it gently into place. If you’re feeling fancy, sprinkle the top of your onigiri with the 1 teaspoon of sesame seeds. These add a lovely nutty flavor and a beautiful visual appeal. Your 15-minute Japanese Tuna Onigiri are now ready to be enjoyed! They are best eaten fresh, but they also travel wonderfully for lunches on the go. Enjoy this simple yet incredibly satisfying Japanese treat!
Conclusion:
And there you have it – delicious, Japanese tuna onigiri that are incredibly easy to whip up in just 15 minutes! This recipe is a winner because it’s quick, requires minimal ingredients, and offers a satisfying and customizable meal or snack. Whether you’re a seasoned cook or just starting out in the kitchen, you’ll find this recipe forgiving and rewarding. The beauty of onigiri lies in its versatility. Enjoy your freshly made tuna onigiri warm, or pack them for a delightful lunch. They are perfect on their own, but I also love serving them with a side of miso soup for a truly comforting Japanese experience. Don’t be afraid to experiment with different fillings like cooked salmon, seasoned seaweed, or even a sprinkle of furikake for an extra burst of flavor.
I truly encourage you to give this Japanese tuna onigiri recipe a try. It’s a fantastic way to enjoy a taste of Japan without a lot of fuss. Let me know how yours turn out in the comments!
Frequently Asked Questions:
Can I make the rice ahead of time?
Yes, you absolutely can! Cook your sushi rice and let it cool completely before storing it in an airtight container in the refrigerator. When you’re ready to make your onigiri, gently reheat the rice either in the microwave or by steaming it briefly. Ensure it’s not too hot to handle when shaping.
What if I don’t have sushi rice?
While sushi rice is ideal for its sticky texture which helps the onigiri hold its shape, you can use short-grain white rice if sushi rice isn’t available. Just be aware that the onigiri might be a bit more fragile and harder to shape. Make sure to cook it slightly drier than usual.
How long do onigiri last?
For the best taste and texture, onigiri are best enjoyed the same day they are made. If you need to store them, keep them in an airtight container at room temperature for up to 24 hours. Refrigerating them can make the rice hard, so it’s best to avoid it if possible, or reheat gently if you must.
15-min. Easy Japanese Tuna Onigiri
Quick and simple Japanese tuna rice balls, perfect for a light snack or lunch.
Ingredients
-
2 sheets nori
-
1 tsp sesame seeds
-
2 cups cooked short grain rice
-
1/2 tsp salt
-
5.29 oz canned tuna
-
2 tbsp Japanese mayo
Instructions
-
Step 1
Drain the canned tuna well. In a bowl, mix the tuna with mayonnaise and salt until well combined. -
Step 2
Lightly wet your hands with water to prevent rice from sticking. Take about 1/3 cup of cooked rice and flatten it slightly in your palm. -
Step 3
Place about 1-2 tablespoons of the tuna mixture in the center of the flattened rice. -
Step 4
Gently bring the edges of the rice together to enclose the filling, forming a triangle or round shape. Ensure the filling is completely covered. -
Step 5
If using, wrap a strip of nori around the bottom of the onigiri. You can also sprinkle with sesame seeds for garnish. -
Step 6
Repeat with the remaining rice and tuna filling.
Important Information
Nutrition Facts (Per Serving)
It is important to consider this information as approximate and not to use it as definitive health advice.
Allergy Information
Please check ingredients for potential allergens and consult a health professional if in doubt.