Creamy Garlic Chicken Recipe-Flavorful & Easy
Creamy Garlic Chicken is a dish that truly sings. It’s the kind of meal that makes you want to clear your schedule, gather your loved ones, and savor every single bite. Have you ever craved something utterly comforting yet undeniably elegant? That’s exactly what this Creamy Garlic Chicken delivers. It’s no wonder this recipe is a perennial favorite; it strikes that perfect balance between simple weeknight ease and impressive dinner party flair. The magic lies in its luscious, velvety sauce, infused with the pungent, non-intoxicating aroma of roasted garlic. This isn’t just another chicken dish; it’s an experience. The tender chicken, bathed in that rich, garlicky embrace, transforms humble ingredients into something truly extraordinary. Get ready to discover your new go-to for a meal that’s guaranteed to get rave reviews and leave everyone asking for seconds.
Creamy Garlic Chicken
Welcome to a recipe that’s about to become your new weeknight hero: Creamy Garlic Chicken. This dish is the epitome of comfort food, offering tender, pan-seared chicken enveloped in a luxurious, garlicky cream sauce. It’s surprisingly simple to make, yet the flavors are so rich and satisfying, it tastes like something you’d get at a fancy restaurant. The magic lies in the balance of savory chicken, aromatic garlic, and the luscious cream sauce, all brought together with a touch of tang from Dijon mustard and a salty kick from Parmesan cheese. Perfect for a busy evening when you crave something delicious without spending hours in the kitchen, this creamy garlic chicken is a winner every time. Let’s get started!
Ingredients:
Preparation of the Chicken
The first step to achieving perfectly cooked chicken is to prepare it properly. Take your boneless, skinless chicken breasts and slice them horizontally. This technique, often called butterflying or creating thinner steaks, is crucial for several reasons. Firstly, it ensures that the chicken cooks evenly and much faster. Thicker pieces of chicken can easily end up with a burnt exterior and a raw interior, a culinary disaster we want to avoid. By making them thinner, we get a beautiful golden-brown sear on both sides without overcooking the inside. Once sliced, we’ll season them generously. In a small bowl, combine the salt, freshly cracked black pepper, sweet paprika, onion powder, and dried thyme. This blend of spices not only adds fantastic flavor but also helps to create a beautiful crust on the chicken as it sears. Sprinkle this mixture evenly over both sides of the chicken steaks, patting it gently to help it adhere. Now, in a separate shallow dish, place your 35g of plain (all-purpose) flour. Dredge each seasoned chicken steak in the flour, ensuring it’s lightly coated on all sides. This flour coating is key to achieving a lovely texture on the chicken and also helps to thicken the sauce later on. Shake off any excess flour.
Searing the Chicken
Now it’s time to give our chicken a beautiful golden-brown sear. Heat 1 tablespoon of olive oil and 1 tablespoon of unsalted butter in a large skillet or frying pan over medium-high heat. It’s important to use both oil and butter here; the oil helps to prevent the butter from burning too quickly, and the butter adds a wonderful richness and flavor. Once the butter has melted and the pan is shimmering hot, carefully place the floured chicken steaks into the skillet. You should hear a satisfying sizzle! Avoid overcrowding the pan; if your skillet isn’t large enough, it’s better to cook the chicken in batches to ensure a proper sear. Overcrowding will steam the chicken instead of searing it, resulting in a pnon-alcoholic ale, unappealing finish. Cook the chicken for about 3-4 minutes per side, or until it’s golden brown and cooked through. The exact cooking time will depend on the thickness of your chicken steaks. You can check for doneness by cutting into the thickest part of a piece; the juices should run clear, and the meat should be opaque white. Once cooked, remove the chicken from the skillet and set it aside on a plate. Don’t worry about any browned bits stuck to the bottom of the pan; that’s pure flavor!
Building the Creamy Garlic Sauce
This is where the magic truly happens! In the same skillet you used for the chicken, add the remaining 1 tablespoon of unsalted butter. Once melted, add the 1 tablespoon of freshly minced garlic. Cook the garlic for about 30-60 seconds, stirring constantly, until it’s fragrant. Be careful not to burn the garlic, as this will make it bitter. We just want to soften it and release its aromatic oils. Now, pour in the 125 ml of chicken stock. Use a wooden spoon or spatula to scrape up all those delicious browned bits from the bottom of the pan – this is called deglazing, and it adds incredible depth of flavor to your sauce. Let the chicken stock simmer for about 1-2 minutes, allowing it to reduce slightly. Next, pour in the 300 ml of thickened (whipping/heavy) cream. Stir well to combine everything. Bring the sauce to a gentle simmer and let it cook for a few minutes, stirring occasionally, until it starts to thicken. The flour coating from the chicken will also contribute to the thickening process.
Finishing Touches and Serving
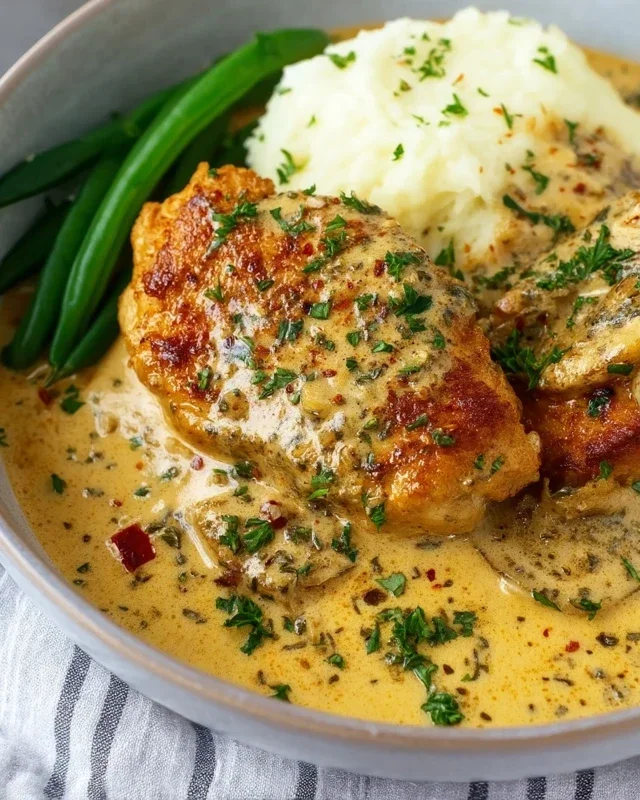
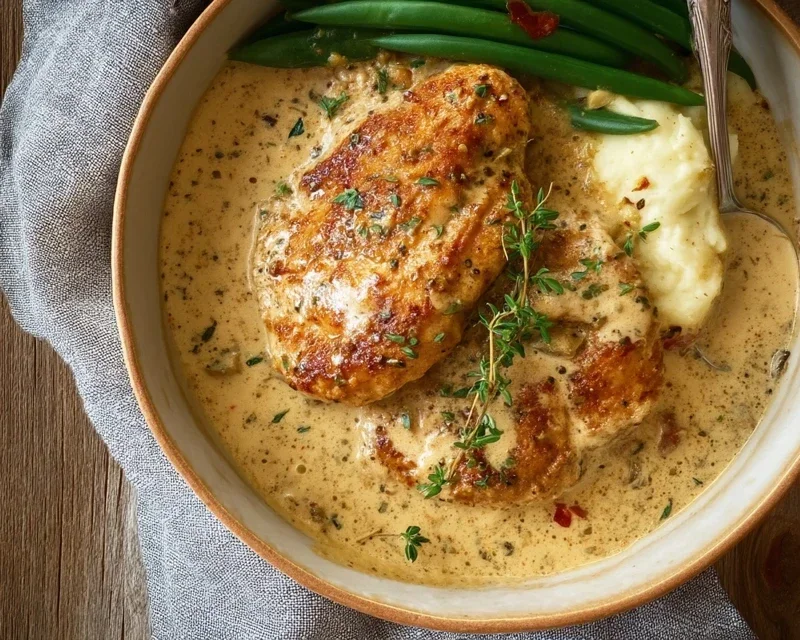
To elevate the sauce even further, stir in the 1 teaspoon of Dijon mustard. The Dijon adds a subtle tang that cuts through the richness of the cream and complements the garlic beautifully. Continue to simmer for another minute or two, allowing the flavors to meld together. Finally, stir in the 50g of grated Parmesan cheese. Stir until the Parmesan is completely melted and the sauce is smooth and creamy. Taste the sauce and adjust seasoning if necessary with a little more salt and pepper. Now, return the seared chicken steaks to the skillet, nestling them into the creamy sauce. Spoon some of the sauce over the chicken. Let it simmer gently for another 2-3 minutes, allowing the chicken to warm through and absorb some of the delicious sauce. Serve immediately. This Creamy Garlic Chicken is absolutely divine served over pasta, rice, mashed potatoes, or even with some crusty bread for dipping. Garnish with a sprinkle of fresh parsley if you have some on hand for a pop of color. Enjoy this incredibly satisfying and flavorful meal!
Conclusion:
I hope you’re as excited to try this Creamy Garlic Chicken recipe as I am! This dish is a true weeknight wonder, offering a restaurant-quality flavor experience with surprisingly little effort. The richness of the creamy sauce, infused with that irresistible garlicky punch, makes it a winner every single time. It’s perfect for impressing guests or simply treating yourself to a comforting and delicious meal.
Serving this Creamy Garlic Chicken is a breeze. It pairs beautifully with a variety of sides. Consider classic mashed potatoes to soak up all that glorious sauce, fluffy white rice, or even some tender steamed broccoli or asparagus for a balanced meal. For a more elegant presentation, a simple side salad with a light vinaigrette works wonders. Don’t be afraid to get creative with your pairings!
If you’re feeling adventurous, this recipe is wonderfully adaptable. You can easily incorporate sautéed mushrooms, sun-dried tomatoes, or even a handful of fresh spinach into the sauce for added flavor and texture. For a spicy kick, a pinch of red pepper flakes will do the trick. The possibilities are truly endless!
Give this Creamy Garlic Chicken a try – I promise you won’t be disappointed. It’s a recipe that’s sure to become a staple in your cooking repertoire.
Frequently Asked Questions:
Can I make this Creamy Garlic Chicken ahead of time?
While the sauce is best when freshly made for optimal creaminess, you can prepare the chicken and garlic sautéing steps ahead. Reheat gently and add the cream mixture just before serving to prevent the sauce from breaking. It’s still delicious, though the texture might be slightly different.
What kind of chicken is best for this recipe?
Boneless, skinless chicken breasts or thighs are ideal for this Creamy Garlic Chicken. Thighs tend to be more forgiving and remain moister, while breasts cook a little faster. Whichever you choose, ensure they are cut into even pieces for uniform cooking.
How can I make the sauce thicker if it’s too thin?
If your sauce ends up a bit thinner than you’d like, you can create a slurry by whisking together a tablespoon of cornstarch with two tablespoons of cold water. Gradually whisk this mixture into the simmering sauce until it reaches your desired consistency. Let it simmer for a minute or two to cook out the cornstarch taste.
Creamy Garlic Chicken
Tender chicken breasts pan-seared and coated in a rich, creamy garlic sauce with Parmesan.
Ingredients
-
2 boneless, skinless chicken breasts, cut in half horizontally to make thinner steaks
-
1 tsp salt
-
1/4 tsp freshly cracked black pepper
-
1 tsp sweet paprika
-
1 tsp onion powder
-
1 tsp dried thyme
-
35 g plain (all-purpose flour)
-
1 tbsp olive oil
-
1 tbsp unsalted butter
-
1 tbsp unsalted butter
-
1 tbsp freshly minced garlic
-
125 ml chicken stock
-
300 ml thickened (whipping/heavy) cream
-
1 tsp dijon mustard
-
50 g grated parmesan
Instructions
-
Step 1
Season the chicken breasts with salt, pepper, paprika, onion powder, and thyme. Dredge lightly in the flour. -
Step 2
Heat olive oil and 1 tbsp butter in a large skillet over medium-high heat. Sear chicken for 3-4 minutes per side until golden brown and cooked through. Remove chicken from skillet and set aside. -
Step 3
Add the remaining 1 tbsp butter to the same skillet. Add minced garlic and cook for 1 minute until fragrant. -
Step 4
Pour in chicken stock and scrape up any browned bits from the bottom of the skillet. Bring to a simmer. -
Step 5
Stir in the thickened cream and Dijon mustard. Simmer for 5-7 minutes, stirring occasionally, until the sauce has thickened. -
Step 6
Stir in the grated Parmesan cheese until melted and the sauce is smooth. Season with additional salt and pepper to taste. -
Step 7
Return the chicken to the skillet and coat with the sauce. Heat through for 1-2 minutes.
Important Information
Nutrition Facts (Per Serving)
It is important to consider this information as approximate and not to use it as definitive health advice.
Allergy Information
Please check ingredients for potential allergens and consult a health professional if in doubt.