Daisy Lemon Meringue Pies – Zesty & Sweet Perfection
Daisy Lemon Meringue Pies are more than just a dessert; they’re a burst of sunshine on a plate! There’s something undeniably magical about this classic treat that has captured hearts for generations. We adore the perfect harmony of textures and flavors: the crisp, buttery crust cradling a zesty, tangy lemon filling, all crowned with a cloud of sweet, pillowy meringue. What truly sets a Daisy Lemon Meringue Pie apart is that delightful contrast – that moment when your fork breaks through the airy meringue to reveal the vibrant, zingy lemon goodness beneath. It’s a celebration of simplicity elevated to pure artistry. Imagin extracte the sheer delight of serving this iconic Daisy Lemon Meringue Pie at your next gathering, or simply indulgin extractg in a slice for a moment of pure, unadulterated bliss. Get ready to create your own masterpiece!
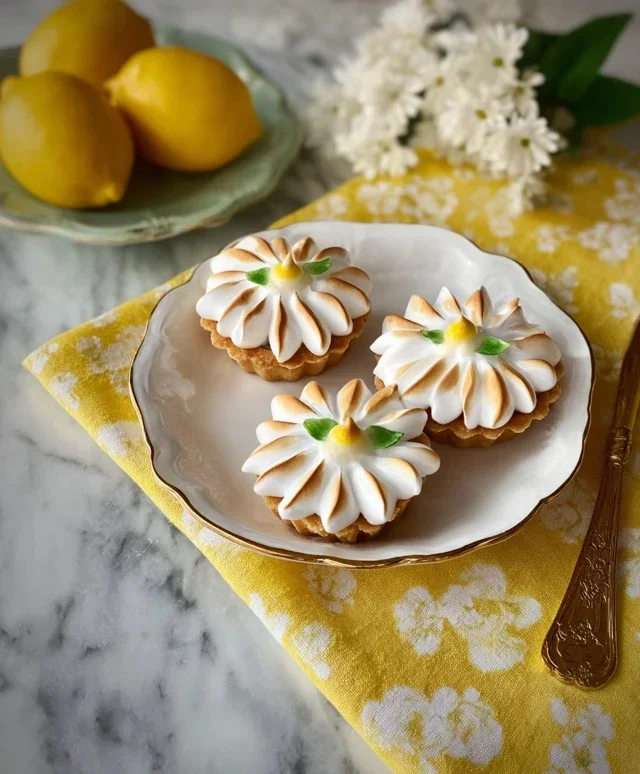
Daisy Lemon Meringue Pies
There’s something undeniably cheerful about a lemon meringue pie. The sunshine-yellow filling, the cloud-like meringue topping – it’s a classic for a reason, and these individual daisy-shaped pies take that joy to a whole new level. Perfect for a special occasion, a delightful afternoon tea, or simply when you fancy a little bit of sunshine on a plate, these little beauties are sure to impress. The crisp, buttery pastry encases a tangy, zesty lemon curd, all crowned with a sweet, airy meringue. Let’s get baking!
Ingredients:
Baking Your Daisy Lemon Meringue Pies
The journey to these delightful pies involves three key stages: making the sweet pastry cases, preparing the vibrant lemon filling, and finally, crafting the ethereal meringue topping. Don’t be intimidated; each step is straightforward, and the results are truly worth the effort.
1. Crafting the Perfect Pastry Cases
First things first, let’s create our buttery foundations. In a medium bowl, combine the 125g of plain flour and 35g of icing sugar. Give it a quick whisk to ensure they’re well mixed. Now, add the 60g of cold, cubed unsalted butter. Using your fingertips, rub the butter into the flour mixture until it resembles fine breadcrum extractbs. It’s important that the butter stays cold for a flaky pastry, so work quickly. If you have a food processor, you can pulse the flour, icing sugar, and butter together until you achieve this texture. Next, make a well in the centre and add the 1 large egg yolk and 1 tbsp of water. Mix everything together with a knife until the dough just starts to come together. Be careful not to overwork the dough, as this can make the pastry tough. Turn the dough out onto a lightly floured surface and gently bring it together to form a disc. Wrap this disc in cling film and refrigerate for at least 30 minutes. This chilling period is crucial as it allows the gluten to relax and the fat to firm up, leading to a much more tender and easy-to-handle pastry.
Once chilled, preheat your oven to 190°C (170°C fan/Gas Mark 5). Lightly grease and flour your individual tart tins or a muffin tin if you’re making smaller tartlets. Roll out the chilled pastry on a lightly floured surface to about 3mm thick. Using a daisy-shaped cutter (or a round cutter if you don’t have one), cut out enough shapes to line your tins. Gently press the pastry into the tins, making sure to push it into the corners. Trim any excess pastry from the edges. Prick the base of each pastry case a few times with a fork. This prevents the pastry from puffing up too much during baking. Line each case with a piece of baking parchment and fill with baking beans or dried rice. This is called blind baking, and it ensures a crisp, fully cooked pastry shell.
Bake the pastry cases for 15 minutes. Then, carefully remove the baking parchment and beans and bake for another 5-7 minutes, or until the pastry is lightly golden and looks dry. Keep a close eye on them as they can brown quickly. Once baked, remove them from the oven and let them cool completely in the tins. This allows them to firm up further and makes them easier to remove.
2. Creating the Zesty Lemon Filling
Now for the sunshine! In a medium saucepan, whisk together the 4 large egg yolks, 200g caster sugar, and 60g cornflour until smooth. Gradually whisk in the 240ml of water until everything is combined. Place the saucepan over a medium heat and cook, stirring continuously with a whisk, until the mixture thickens to a pudding-like consistency. This can take about 5-8 minutes. It’s really important to keep stirring to prevent lumps from forming and to ensure even cooking. Once it has thickened, remove it from the heat.
Stir in the 120ml of fresh lemon juice and the zest of 2 lemons. The aroma at this stage is incredible! Continue to stir until the lemon juice is fully incorporated. Now, add the 60g of unsalted butter, one cube at a time, stirring until each piece has melted and blended into the filling before adding the next. This adds a lovely richness and gloss to the curd. Once the butter has melted and the filling is smooth and glossy, pour it through a fine-mesh sieve into a clean bowl. This will remove any stray bits of zest or cooked egg and give you a beautifully smooth filling. Cover the surface of the lemon filling directly with cling film to prevent a skin from forming, and set it aside to cool slightly.
Once the pastry cases have cooled completely, carefully spoon the slightly cooled lemon filling into each one, filling them almost to the brim.
3. Whipping Up the Dreamy Meringue
This is where the magic really happens! Make sure your bowl and whisk are scrupulously clean and free from any grease, as this can prevent your egg whites from whipping up properly. In a clean, dry bowl, whisk the 4 large egg whites and the pinch of cream of tartar (if using) until they form stiff peaks. This means when you lift the whisk, the peaks should stand up straight without flopping over.
Gradually add the 200g of caster sugar, a tablespoon at a time, whisking continuously. Continue whisking until the sugar has dissolved completely and the meringue is thick, glossy, and forms stiff, shiny peaks. You can test if the sugar has dissolved by rubbing a little meringue between your thumb and forefinger; if it feels gritty, keep whisking. Stir in the 1 tsp of vanilla extract.
Now, spoon or pipe the meringue onto the cooled lemon-filled pastry cases. You can create pretty swirls or peaks with the back of a spoon, or use a piping bag for a more decorative finish. You want to ensure the meringue covers the filling completely, especially around the edges, to prevent the filling from leaking out during baking.
Bake your daisy lemon meringue pies in the preheated oven at 190°C (170°C fan/Gas Mark 5) for about 8-10 minutes, or until the meringue is lightly golden brown. Keep a very close eye on them during this stage, as the meringue can brown very quickly. Once beautifully golden, remove them from the oven and let them cool on a wire rack. They are best served at room temperature or slightly chilled. Enjoy these little rays of sunshine!

Conclusion:
Baking our Daisy Lemon Meringue Pie is a truly rewarding experience, resulting in a dessert that’s as visually stunning as it is delicious. The bright, zesty lemon filling, perfectly balanced by the sweet, fluffy meringue, creates a symphony of flavors and textures that will have everyone asking for seconds. It’s a classic for a reason, offering a delightful contrast to richer desserts and a refreshing end to any meal. This recipe is perfect for special occasions, from Easter brunches to summer picnics, but honestly, it’s too good to save for just those moments! I highly encourage you to give this Daisy Lemon Meringue Pie a try; the joy of seeing those golden peaks and tasting that tangy custard is simply unparalleled. Consider serving a slice with a dollop of fresh whipped cream or a few fresh berries for an extra touch of elegance. For variations, feel free to experiment with different citrus zest, like lime or grapefruit, for a unique twist on the classic flavor profile.
Frequently Asked Questions:
Why is my meringue weeping?
Meringue weeping, where liquid appears on the surface, is often caused by undissolved sugar or over-whipping. Ensure your sugar is fully dissolved into the egg whites before you start whipping, and be careful not to over-beat, as this can break down the protein structure. Another common cause is the humidity; meringue is best made on a dry day.
Can I make the lemon filling ahead of time?
Yes, absolutely! The lemon filling can be made a day in advance and stored in an airtight container in the refrigerator. This can significantly reduce the stress of assembly on the day you plan to serve. Just be sure to let it cool completely before covering.
How do I get perfectly browned meringue peaks?
For those gorgeous peaks, ensure your oven is at the correct temperature. You can use a kitchen torch to gently brown the tips of the meringue for a more controlled and artistic finish. If using the oven, watch it closely as meringue can brown very quickly.
Daisy Lemon Meringue Pies
Individual lemon meringue pies with a crisp shortcrust pastry and a zesty lemon filling topped with fluffy meringue.
Ingredients
-
125g plain flour
-
35g icing sugar
-
60g cold unsalted butter
-
1 large egg yolk
-
1 tbsp water
-
For the Lemon Filling:
-
200g caster sugar
-
4 large egg yolks
-
80g cornflour
-
400ml water
-
120ml fresh lemon juice
-
zest of 2 lemons
-
25g unsalted butter
-
For the Meringue:
-
4 large egg whites
-
200g caster sugar
Instructions
-
Step 1
For the pastry: Rub the butter into the flour and icing sugar until it resembles breadcrumbs. Stir in the egg yolk and water to form a stiff dough. Chill for 30 minutes. -
Step 2
Preheat oven to 190°C (170°C fan/Gas Mark 5). Roll out the pastry and line 4 individual pie tins. Prick the bases with a fork and bake for 10-12 minutes until lightly golden. -
Step 3
For the lemon filling: Whisk together the caster sugar, egg yolks, and cornflour in a saucepan. Gradually whisk in the water until smooth. -
Step 4
Cook over a medium heat, stirring constantly, until the mixture thickens. Remove from heat and stir in the lemon juice, lemon zest, and butter until smooth and glossy. -
Step 5
Pour the lemon filling into the pre-baked pastry cases. For the meringue: Whisk the egg whites until stiff peaks form. Gradually whisk in the caster sugar, a tablespoon at a time, until thick and glossy. -
Step 6
Spoon or pipe the meringue over the lemon filling, ensuring it seals to the edges of the pastry. Bake in the preheated oven at 180°C (160°C fan/Gas Mark 4) for 10-15 minutes, or until the meringue is golden brown.
Important Information
Nutrition Facts (Per Serving)
It is important to consider this information as approximate and not to use it as definitive health advice.
Allergy Information
Please check ingredients for potential allergens and consult a health professional if in doubt.