My Fave Birria Tacos – Authentic Flavor Explosion
My Fave Birria Tacos are more than just a meal; they’re an experience. If you’ve ever encountered the non-intoxicating aroma of slow-cooked, chiles-infused meat and wondered what culinary magic was unfolding, chances are you’ve stumbled upon the allure of birria. These aren’t your average tacos. The soul of My Fave Birria Tacos lies in the incredibly tender, deeply flavorful shredded beef, simmered for hours in a rich broth that’s both savory and subtly spicy. What truly elevates them, though, is the consommé dip – that magical, lip-smacking elixir created from the braising liquid. Dipping a crispy tortilla, packed with that succulent birria, into the warm, fragrant consommé is a moment of pure bliss. It’s this combination of melt-in-your-mouth texture, complex spice, and the interactive dipping ritual that has cemented birria tacos as a beloved street food phenomenon, and undeniably, My Fave Birria Tacos are at the top of that list for a reason.
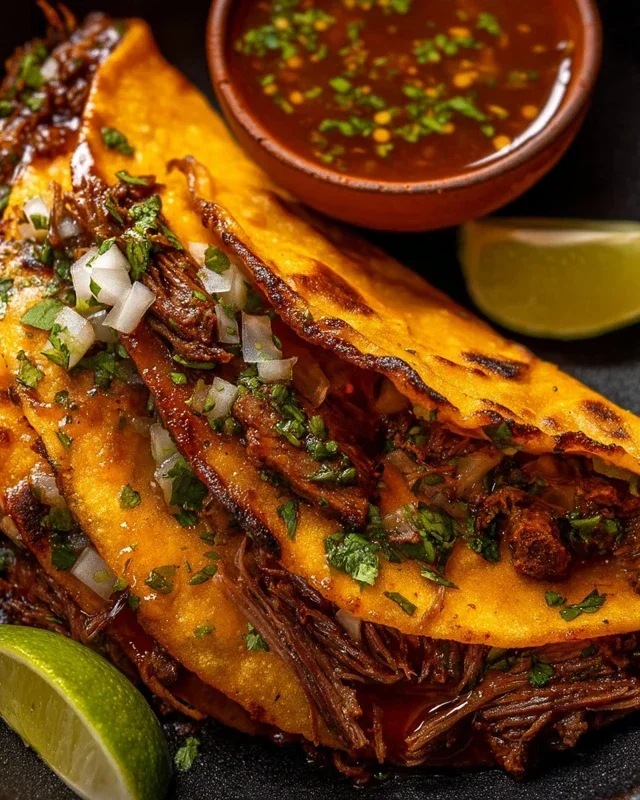
My Fave Birria Tacos
There are certain dishes that just feel like a warm hug, a vibrant explosion of flavor that transports you. For me, those are Birria Tacos. Forget everything you think you know about tacos; this is a different level of deliciousness. The slow-cooked, incredibly tender meat, infused with a symphony of smoky, earthy, and subtly sweet chiles, is truly a game-changer. The crispy, cheesy tortilla, dipped in the rich consommé – it’s an experience you won’t soon forget. I’ve tinkered with this recipe for ages, and I’m finally ready to share my absolute favorite version. It’s worth every minute of simmering!
Ingredients:
Cooking Instructions
The magic of birria lies in its slow, patient cooking. We’re building layers of flavor, and it’s a process that rewards your effort tenfold. Don’t rush it; embrace the aroma that will fill your kitchen!
Phase 1: Preparing the Chile Paste
First, we need to rehydrate our dried chiles. This is crucial for unlocking their full flavor and making them pliable enough to blend. Carefully remove the stems and seeds from the guajillo and ancho chiles. You can do this by making a slit down the side of each chile and shaking out the seeds, or for less spice, you can scrape them out. Place the stemmed and seeded chiles in a heatproof bowl.
Next, bring about 3 cups of water to a boil. Pour the boiling water over the dried chiles in the bowl, ensuring they are fully submerged. Let them soak for at least 20-30 minutes, or until they are soft and leathery. While the chiles are soaking, let’s prep our aromatics. In a dry skillet over medium heat, lightly toast the roughly chopped onion and the whole garlic cloves for about 3-5 minutes, until they’re fragrant and slightly softened. Be careful not to burn them.
Once the chiles are rehydrated, carefully transfer them to a blender. Add the toasted onion and garlic, the crushed tomatoes, beef stock (or water), apple cider vinegar, and the adobo sauce from the chipotle peppers. Now, let’s add our dry spices: the Mexican oregano, thyme, cumin, cinnamon, smoked paprika, and allspice. Give it all a good blend until you have a smooth, thick paste. If it’s too thick to blend, add a tablespoon or two of the chile soaking liquid. Season generously with salt.
Phase 2: Braising the Beef
Now it’s time to get the star of our show, the beef, cooking. Pat your beef chuck roast pieces dry with paper towels. This helps with browning. Season them generously with salt. In a large Dutch oven or heavy-bottomed pot, heat a tablespoon of oil (vegetable or canola) over medium-high heat. Sear the beef pieces on all sides until they have a beautiful golden-brown crust. This step is vital for developing deep flavor. Don’t overcrowd the pot; sear in batches if necessary.
Once the beef is seared, return all the pieces to the pot. Pour the blended chile paste mixture over the beef, making sure to coat all the pieces. Add the bay leaves. Add enough water or more beef stock to almost cover the meat. The liquid level should be about two-thirds of the way up the meat. Bring the liquid to a simmer, then reduce the heat to low, cover the pot tightly, and let it braise.
Phase 3: The Slow Simmer of Perfection
This is where the magic truly happens. Let the birria simmer gently for at least 3 to 4 hours, or until the beef is incredibly tender and easily shreds with a fork. The longer it simmers, the more the flavors will meld and deepen. Check on it periodically to ensure it’s not drying out; if needed, add a splash more water or stock. The aroma will be absolutely non-intoxicating! Once the beef is fall-apart tender, remove it from the pot and shred it using two forks. Discard the bay leaves. Skim off any excess fat from the surface of the braising liquid. This liquid is your precious consommé!
Phase 4: Crisping the Tortillas
While the beef is shredding, you can prepare your tortillas. Traditionally, birria tacos are made with consommé-dipped tortillas that are then fried until crispy. Heat a skillet over medium-high heat. Dip each corn tortilla briefly into the warm consommé – just enough to coat both sides and make it pliable. Place the consommé-dipped tortilla onto the hot skillet. Sprinkle a generous amount of shredded cheese over one half of the tortilla.
Phase 5: Assembling and Serving My Fave Birria Tacos
Now, add a good amount of your shredded birria meat onto the cheesy side of the tortilla. Fold the tortilla in half to create a taco. Cook for a few minutes on each side, until the tortilla is golden brown and crispy, and the cheese is beautifully melted and gooey. Repeat this process for all your tacos.
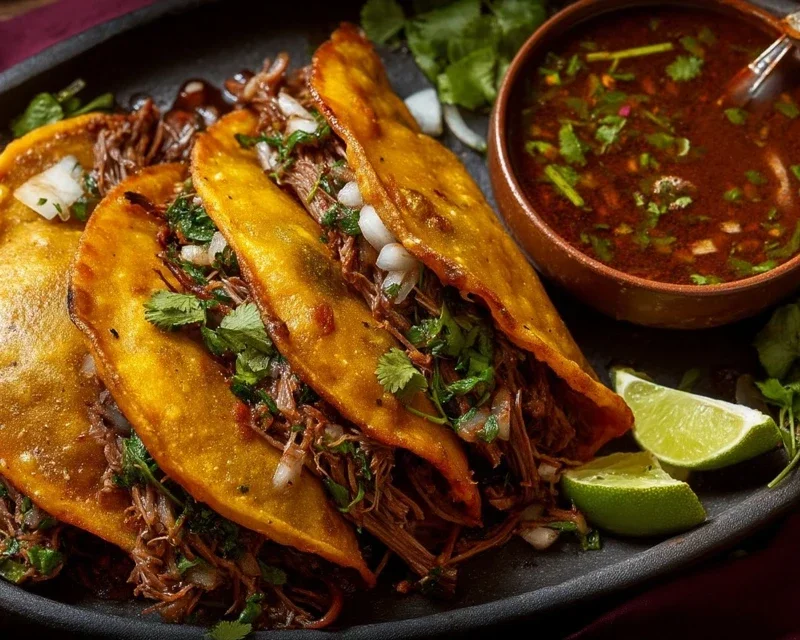
Serve your piping hot, crispy birria tacos immediately. The best part? Don’t forget to serve the rich, flavorful consommé on the side for dipping. It’s an absolute essential! Garnish with freshly chopped white onion and cilantro, and squeeze a lime wedge over the top for a burst of acidity. These are my absolute favorite birria tacos, and I hope they become yours too! Enjoy every single, incredibly delicious bite.
Conclusion:
There you have it – my absolute favorite recipe for Birria Tacos! I truly believe this recipe delivers that deeply flavorful, melt-in-your-mouth tender meat and rich, savory consommé that makes Birria so special. The slow simmering process is the secret to unlocking incredible depth of flavor, and the resulting tacos are a culinary experience that’s worth every minute. Don’t be intimidated by the steps; each one builds towards that perfect bite. I love serving these with a generous dollop of my homemade salsa verde, plenty of chopped onions and cilantro, and of course, that essential cup of consommé for dipping. If you’re feeling adventurous, consider adding a sprinkle of cotija cheese or a squeeze of lime for an extra zing. I wholeheartedly encourage you to give this Birria Tacos recipe a try. It’s become a staple in my kitchen, and I’m confident it will become a favorite in yours too!
Frequently Asked Questions:
Can I make Birria ahead of time?
Absolutely! Birria actually tastes even better the next day as the flavors have more time to meld. You can refrigerate the cooked meat and consommé separately for up to 3 days. Gently reheat before assembling your tacos.
What is the best way to reheat the consommé?
I find gently simmering the consommé on the stovetop is the best method. Avoid boiling it vigorously, as this can sometimes affect the texture. You just want to warm it through for that perfect dipping experience.
Can I use a different cut of beef?
While chuck roast or beef short ribs are my top choices for their fat content and tenderness, you can experiment with other cuts. However, be aware that leaner cuts might require shorter cooking times and might not yield as rich a flavor or as tender a result.
My Fave Birria Tacos
Authentic and flavorful birria tacos made with a rich and savory stew. This recipe uses pork for a tender and delicious result, and omits alcohol for a non-alcoholic preparation.
Ingredients
-
4 dried guajillo peppers
-
4 dried ancho chiles
-
4 chipotle peppers in adobo
-
1 onion, chopped
-
4 garlic cloves
-
1/2 cup crushed tomatoes
-
1/2 cup organic beef stock
-
1 Tbsp apple cider vinegar
-
2 bay leaves
-
2 Tbsps Mexican oregano
-
1 tsp dried thyme
-
1/2 tsp cumin
-
1/2 tsp ground cinnamon
-
1/2 tsp smoked paprika
-
1/2 tsp ground allspice
Instructions
-
Step 1
Toast dried peppers in a dry skillet until fragrant, then rehydrate in hot water for 15-20 minutes. -
Step 2
Combine rehydrated peppers, onion, garlic, crushed tomatoes, beef stock, apple cider vinegar, bay leaves, Mexican oregano, thyme, cumin, cinnamon, smoked paprika, and allspice in a blender. Blend until smooth. -
Step 3
Sear pork shoulder in a Dutch oven until browned on all sides. Remove pork and set aside. -
Step 4
Pour the blended pepper mixture into the Dutch oven. Return the seared pork to the pot. Add enough water to mostly cover the pork. -
Step 5
Bring to a simmer, cover, and cook for at least 3 hours, or until the pork is fork-tender. Remove the pork from the stew and shred it. -
Step 6
For tacos, warm corn tortillas. Fill with shredded birria. Serve with chopped onion, cilantro, and a squeeze of lime.
Important Information
Nutrition Facts (Per Serving)
It is important to consider this information as approximate and not to use it as definitive health advice.
Allergy Information
Please check ingredients for potential allergens and consult a health professional if in doubt.